In an earlier article on Respawn Zones, I discussed the Halo: Reach spawn engine model as it was presented to us by Bungie. However, there are some issues that interfere with the published model that the forger must understand so that they are not surprised or confused when they see the spawning behavior appear to break.
This article will compliment my earlier article discussing Respawn Zones, to clarify how the Strong Zone can be overcome by several different factors. The reader may wish to first read the preceding article to understand the context of this article.
This article will discuss the following topics:
This article will compliment my earlier article discussing Respawn Zones, to clarify how the Strong Zone can be overcome by several different factors. The reader may wish to first read the preceding article to understand the context of this article.
This article will discuss the following topics:
- The impact of Stock Pile Drop Zones
- Designing for desired Line Of Sight (LOS) behavior
These are unexpected and unintuitive influencers that were discovered and are further being characterized that were not originally documented by Bungie. This article presents what is known thus far, but I am still waiting to hear from Bungie on some details.
Stock Pile Drop Zone
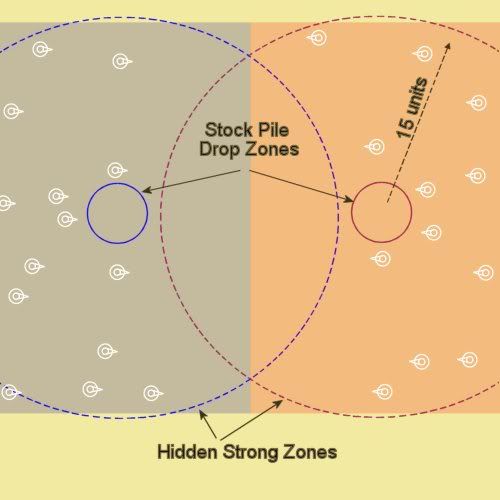
According to Bungie, the Stock Pile Drop Zone creates an unintended and unintuitive Strong Zone of 15 units in radius, and approximately 5 units up and 5 units down. Test consistently confirm the radius is 15 units. Additionally, there appears to be no significant decay beyond the border.
This can serious impact a map's design for objective spawning strategies. Normally, the forger would cover half the map with a blue Strong Zone and half with a red Strong Zone, thus defining where the two teams will respawn during the game. This prevents the two teams from respawning near the other teams' flag or bomb, or even stock pile drop zone.
Typically, the forger uses neutral Respawn Points through out the map to be used by FFA game types and allow the Strong Zones to define where the two teams will respawn during the game.

But if the Stock Pile Drop Zone is within 15 units of the other team's neutral Respawn Points, then those Respawn Points can be used by both teams. This can result in the teams spawning near or right next to the enemy's Stock Pile Drop Zone. This is as bad as the enemy spawning near your flag stand.

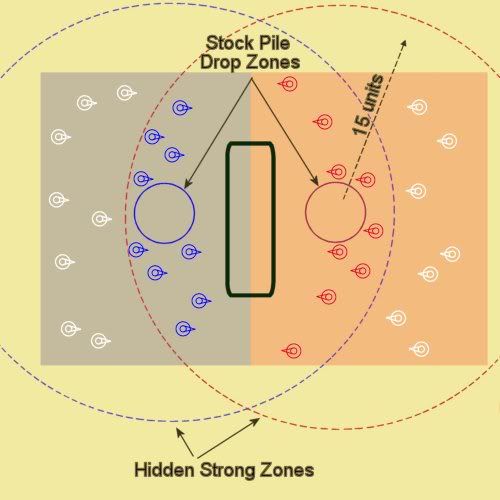
The second map shown above shows an obstacle in the middle of the map that the forger believes will permit the drop zones to be closer to the center (after all, you have to travel around the obstacle). But in fact the drop zones are now within 15 units of the other team's Respawn Points, allowing each team to respawn near the other team's drop zone.
For small maps, Stock Pile is a challenging game type to incorporate into the map for this very reason. One solution is to set all the Respawn Points in the red Strong Zone to red team assignment if they fall within 15 units of the blue team's Stock Pile Drop Zone. However, these Respawn Points cannot be used for FFA game types.
The bottom line is that Stock Pile is problematic for forgers for some maps, with little or no work around available.
Bug Discovered in Stock Pile Game Types
Stock Pile game type appears to activate every Strong Zone on the map, disregarding their game type labels (e.g., CTF, INFECTION, FFA_ONLY, etc.). This can have profound affects on Stock Pile game play on a map that uses Strong Zones beyond the typical red v blue, split the map down the middle layout.[1] See the details in the Bugs List article.
Too Many Zones Breaks The Strong Zone
There is a bug in the Spawn Engine that has to do with the case where the forger places too many Weak or Anti Zones, then places a Strong Zone. In this case the Strong Zone is non functional. See the details in the Bugs List article.
Essentially, the forger can add a Strong Zone, but the Strong Zone does not work as advertised.
According to Bungie, the Stock Pile Drop Zone creates an unintended and unintuitive Strong Zone of 15 units in radius, and approximately 5 units up and 5 units down. Test consistently confirm the radius is 15 units. Additionally, there appears to be no significant decay beyond the border.
This can serious impact a map's design for objective spawning strategies. Normally, the forger would cover half the map with a blue Strong Zone and half with a red Strong Zone, thus defining where the two teams will respawn during the game. This prevents the two teams from respawning near the other teams' flag or bomb, or even stock pile drop zone.
Typically, the forger uses neutral Respawn Points through out the map to be used by FFA game types and allow the Strong Zones to define where the two teams will respawn during the game.
But if the Stock Pile Drop Zone is within 15 units of the other team's neutral Respawn Points, then those Respawn Points can be used by both teams. This can result in the teams spawning near or right next to the enemy's Stock Pile Drop Zone. This is as bad as the enemy spawning near your flag stand.
The second map shown above shows an obstacle in the middle of the map that the forger believes will permit the drop zones to be closer to the center (after all, you have to travel around the obstacle). But in fact the drop zones are now within 15 units of the other team's Respawn Points, allowing each team to respawn near the other team's drop zone.
For small maps, Stock Pile is a challenging game type to incorporate into the map for this very reason. One solution is to set all the Respawn Points in the red Strong Zone to red team assignment if they fall within 15 units of the blue team's Stock Pile Drop Zone. However, these Respawn Points cannot be used for FFA game types.
The bottom line is that Stock Pile is problematic for forgers for some maps, with little or no work around available.
Bug Discovered in Stock Pile Game Types
Stock Pile game type appears to activate every Strong Zone on the map, disregarding their game type labels (e.g., CTF, INFECTION, FFA_ONLY, etc.). This can have profound affects on Stock Pile game play on a map that uses Strong Zones beyond the typical red v blue, split the map down the middle layout.[1] See the details in the Bugs List article.
Too Many Zones Breaks The Strong Zone
There is a bug in the Spawn Engine that has to do with the case where the forger places too many Weak or Anti Zones, then places a Strong Zone. In this case the Strong Zone is non functional. See the details in the Bugs List article.
Essentially, the forger can add a Strong Zone, but the Strong Zone does not work as advertised.
Line Of Sight
Line of Sight was found to be such a strong influence that it actually was able to overcome the Strong Zone influence in some cases. This is still being characterized, but a behavior pattern has begun to emerge that a forger can use to his advantage. I am still waiting to get additional feedback from Bungie on this anomaly and will provide updates to this article as necessary.
LOS of most weapons can overcome the Strong Zone by providing more negative weight on a Respawn Point than the Strong Zone applies positive weight [2]. That being said, the rest of this section will discuss how to control which of the two (LOS or Strong Zone) is the dominate influencer.
(update) It has been shown that LOS from any weapon, friendly or enemy, will yield this behavior.
For a given team, if the number of compatible Respawn Points lying outside the team's Strong Zones are greater than the number of compatible Respawn Points lying inside the team's Strong Zones, then LOS becomes the dominate influencer. If those outside are equal or less in number than those inside, then the Strong Zone becomes the dominate influencer and cannot be overcome by any combination of negative influences [3].
The forger can utilize this information to his advantage. For example, if a forger wishes never to allow LOS to overcome a Strong Zone, and thus use such a design decision to reinforce the model of a Strong Zone defining the boundaries of a team's respawn, then the forger will want to ensure that the red team never sees more compatible Respawn Points outside the red Strong Zone than inside it. This means that Respawn Points outside the red Strong Zone can be neutral, but some should be blue (or other team assignments). Same for blue team.
If the forger wishes to have the affect of being able to overcome the Strong Zone (this is really for expert forgers to use), then they can simply add red Respawn Points outside the Respawn Zone. They won't be used for any other team or FFA, but they will enable this anomaly.
It is recommend that the forger design to enforce the Strong Zone dominate design. The reason for this recommendation is that Bungie may fix the anomaly. Any map designed to exploit it would then break.
Finally, let me clarify the point of this discussion. The difference between LOS overcoming the Strong Zone or not is simply that the former makes it possible for the spawning player to respawn outside the Strong Zone, where the latter does not.
Regardless of whether the Strong Zone can be overcome by LOS, if you have two available Respawn Points within a Strong Zone, and LOS is trained on only one of them, the other will be used.
The scenario where a player will respawn outside the Strong Zone comes into play only if the LOS can overcome the Strong Zone and all available Respawn Points within the Strong Zone are overcome by LOS. (Obstructed Respawn Points are not available Respawn Points.) In this case, the weight of the Respawn Points within the Strong Zone will be less than any Respawn Point outside the Strong Zone. And thus, the player will respawn outside the Strong Zone.
Summary
By understanding these anomalies, the forger can introduce predictability into their map once again, rather than succumb to unintended spawning behaviors.
______________________
[1] Not yet confirmed a bug by Bungie. I may wait to ask 343 when they come online.
[2] It is still not clear if the Strong Zone is being weakened by the configuration, or if the LOS is being strengthened. All we know at this point is that depending upon the configuration, the two compete for the title of the strongest influencer.
[3] According to Bungie, a Strong Zone cannot be overcome by any combination of negative influences. However, since the discovery that LOS can overcome Strong Zones, the margin no longer appears wide enough for such a confident claim. Now it is questionable if there can exist a combination that can overcome a Strong Zone when the Strong Zone is the dominate influencer, though none has been observed to date.
No comments:
Post a Comment
Note: Only a member of this blog may post a comment.