With the misinformation about Respawn Zones present in the forging community today, this article is a refreshing look at the Respawn Zone from a simple perspective, based upon the scientific approach of asserting official documentation.
Introduction
It is the intent of this article to present Respawn Zones in their true simplicity and intended use. Once an accurate understanding of Respawn Zone behavior is grasped, the forger can forge into a map his desired spawning experience with complete predictability. By predictability, I do not mean that the forger will know when each player shall spawn on each respawn point. But, rather, that his expectations shall be fully enforced (e.g., a player cannot spawn in the enemy base).
It is the intent of this article to present Respawn Zones in their true simplicity and intended use. Once an accurate understanding of Respawn Zone behavior is grasped, the forger can forge into a map his desired spawning experience with complete predictability. By predictability, I do not mean that the forger will know when each player shall spawn on each respawn point. But, rather, that his expectations shall be fully enforced (e.g., a player cannot spawn in the enemy base).
While much work went into making this document as terse as possible, emphasis was placed on depth and explicit text to eliminate ambiguity. This article may seem a long read, but it will provide the reader with an unparalleled understanding of the Respawn Zones and their roles in forging the spawn experience that can result in a fully predictable design.
The reader is also encouraged to look at the other articles I have written to compliment this article. These include Invasion Spawn Tutorial - a look at how the Invasion spawn engine works; Respawn Zone anomalies, - an article that covers the known anomalous behaviors of the Respawn Zone (e.g., Stock Pile zone); Conditional Respawn Zones - a look at enabling or disabling certain Respawn Zones during CTF or Assault; and Known Bugs With The Spawn Engine - a list of known bugs in the Spawn Engine, what we know about them, how we determined their existence, and any known work arounds.
Basics of Respawn Zones
Respawn Zones, also known as Strong Zones, apply a massive positive weight to Respawn Points within their volume. This weight is so great that it would require a tremendous amount of negative influencers to match it and overcome it.
Terms: For the remainder of this article, Respawn Zones shall refer to all three classes of respawn zones collectively, while Strong Zones shall refer to only those zones titled in Forge as Respawn Zone, and shall not refer to either Weak Respawn Zones, nor Anti Respawn Zones.
The Line Of Sight (LOS) cone influencer alone is capable of matching the weight of a Strong Zone in only some cases [1][2]. Apart from the LOS influencer, no other combination of negative influencers is known capable of overcoming the Strong Zone’s influence.
A Strong Zone literally moves its Respawn Points into a weighting class all of their own. This is why it has been said that Strong Zones define hard boundaries for a team to respawn in.
To force a player to respawn outside his team’s Strong Zone, every team compatible Respawn Point within the Strong Zone must either become obstructed or have its weight reduced below one or more available Respawn Points outside the Strong Zone. To eliminate this possibility from occurring, the forger merely need to include plenty of Respawn Points strategically positioned within the Strong Zone so that no combination of obstructing and LOS aiming can prevent the entire enemy team from respawning within their Strong Zone simultaneously.
According to Bungie, Strong Zones do not alter their applied weights upon Respawn Points within their volumes due to enemies, allies, deaths, or any other conditions within their volumes, immediately external to their volumes, or due to any condition within any other type of Respawn Zone on the map. Their only behavior is to add a flat and constant weight to every Respawn Point within their volume.
Since the Respawn Points within a Strong Zone are in a weighting class all of their own such that no Respawn Point outside the Strong Zone has any hope of competing for selection by the spawn engine, then it follows that two disparate Strong Zones assigned to the same team in effect form a singular collection of Respawn Points in this uber weight class, as though they were all within one Strong Zone. It is not which Strong Zone a particular Respawn Point belongs to that the spawn engine considers, but rather the total weight applied to the Respawn Point.
Though they apply overwhelmingly strong positive weights to Respawn Points, Strong Zones never combine their weights with each other. This is why covering the whole map with a neutral Strong Zone invalidates any team assigned Strong Zones that cover only parts of the map (e.g., red half v blue half). The neutral Strong Zone will qualify all Respawn Points on the map with the same weight for all players, regardless of team assignment, while the red Strong Zone does not add any additional weight for red team players – it won’t combine its weight with the neutral Strong Zone.
Strong Zones do combine weights with Weak Respawn Zones and Anti Respawn Zones. According to Bungie,
Strong + Weak > Strong.
While this is true, it can easily be misinterpreted as something like
2 + 1 > 2
But a more correct interpretation would make the weights look very lopsided, possibly more like
10000 + 1 > 10000
Therefore, a better definition that will help you understand how to use Strong Zones would be something like, a zone whose boundaries define such strongly weighted Respawn Points that their exclusive use in respawning is an absolute certainty, so long as at least one of them is available for use by the spawn engine and has not been driven down too low by LOS influencer.
Weak Respawn Zones are Respawn Zones that add the weight of approximately one teammate standing near a Respawn Point to all available Respawn Points in the Weak Respawn Zone, according to Bungie.
Weak Respawn Zones are Respawn Zones that add the weight of approximately one teammate standing near a Respawn Point to all available Respawn Points in the Weak Respawn Zone, according to Bungie.
Terms: For the remainder of this article, Weak Respawn Zones shall be referred to as Weak Zones.
According to tests, this weight is between one and two teammates standing near a Respawn Point, most likely just a little more than one. The weights of Weak Zones combine within the intersections of their volumes only if those intersections are also intersected by Strong Zones.
Since Weak Zones add a weight to a Respawn Point that is just a bit more than that of a teammate’s proximity, using a Weak Zone is a forger’s way of making the Respawn Point more preferential in comparison to any Respawn Point that is in proximity to a teammate anywhere else on the map. Weak Zones are the means by which a forger can tell the spawn engine that certain Respawn Points are preferred over others for the purpose of working with his design, rather than just following a pre-established set of algorithms.
According to Bungie, Weak Zones do not alter their applied weights upon Respawn Points within their volumes due to enemies, allies, deaths, or any other conditions within their volumes, immediately external to their volumes, or due to any condition within any other type of Respawn Zone on the map. Their only behavior is to add a flat and constant weight to every Respawn Point within their volume.
Take everything said about Weak Zones and apply them to Anti Respawn Zones, only with a negative weight. Instead of “preferred”, insert “deterred”.
Terms: For the remainder of this article, Anti Respawn Zones shall be referred to as Anti Zones.
According to Bungie, Weak Zones and Anti Zones combine weights when their intersections intersect Strong Zones, according to the following equations.
Anti + Anti < Anti
Weak + Weak > Weak
Anti + Weak = 0
According to Bungie, only a Weak Zone and an Anti Zone combine weights when their intersection does not intersect a Strong Zone, according to the following equations.
Anti + Anti = Anti
Weak + Weak = Weak
Anti + Weak = 0
While Bungie has not confirmed at the time of this writing, tests strongly suggest that the previous rules are erroneous and that Anti Zones do combine weights even in the absence of a Strong Zone, just as they would within the intersection of a Strong Zone, according to the following equation.
Anti + Anti < Anti
And as you would expect, adding Weak Zones and Anti Zones effectively feather the weights applied to the Respawn Points within additional values to give preference or deterrence for the spawn engine’s consideration.
Strong + Weak > Strong
Strong + Weak + Weak > Strong + Weak
Strong + Anti < Strong
Strong + Anti + Anti < Strong + Anti
Summary
Strong Zones say you want to confine a team’s respawn to the zone, with the condition that at least one Respawn Point within the Strong Zone must be available for use by the spawn engine and not driven too low by LOS influencers.
Weak Zones say you really want to respawn here. Two Weak Zones say you really, really want to respawn here.
Anti Zones say you really do NOT want to respawn here. Two Anti Zones say you really, really do NOT want to respawn here.
Additional Information
According to Bungie, it is useless to know specific weights applied by influencers without having their tools, and their tools do not come with the game CD. For this and other reasons, Bungie does not publish the weights.
According to Bungie, when the spawn engine detects a tie among Respawn Points for the highest weight, the spawn engine adds to each a tiny random value for the purpose of breaking the tie. This random tie breaker is also the reason that we observe what appears to us as apparently random locations used for respawn over the duration of the game.
Using Anti Zones
The only thing Anti Zones do is drive down the weights of Respawn Points inside them. Without dynamic influencers present, Respawn Points outside the Anti Zone will always be selected for respawn due to their higher weight. This means that the only time the Respawn Points within an Anti Zone are selected by the spawn engine is when negative dynamic influencers drive the weights of other Respawn Points lower than those inside the Anti Zone.
In this section, I will give a few examples of how Anti Zones can be used. But I use these examples only for illustration purposes, to drive home the point that the Respawn Points within Anti Zones are used to deter respawning for the general case. By no means are these the only applications of Anti Zones a forger can come up with.
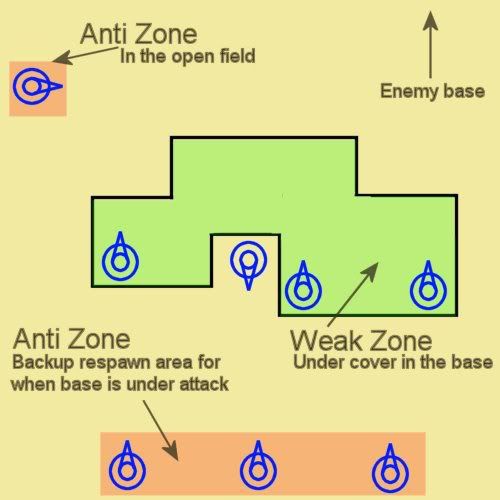
Since negative dynamic influencers are best described as “danger zones” due to combat conditions, we can conclude two things. First, an Anti Zone can be used to convey to the spawn engine that the Respawn Points within an Anti Zone are in a danger zone by design (e.g., they are in the open). The spawn engine would have no other way of knowing, for example, that the forger intends to include a Scorpion or Banshee that can threaten open field spawning across The Canyon.
Second, the forger can anticipate the spawn engine to use those Respawn Points within an Anti Zone when the Respawn Points outside the Anti Zone come under fire. The use of the Anti Zone is a way for the forger to designate a group of Respawn Points as an alternate place to safely respawn in the event that the primary Respawn Points (e.g., in the team base) comes under fire. In a scenario like this, the alternate Respawn Points that are covered with an Anti Zone are at a distance from the team base, usually along the maps’ periphery.
By definition of their limited weighting, team assigned Anti Zones are NOT designed to prevent a player from respawning in their enemy’s base. That is the role of team assigned Strong Zones. Additionally, on many maps, such a use of Team assigned Anti Zones can be thwarted by driving all other Respawn Points lower in weight by using massive negative influencers. Tests have shown that the combination of 10 Anti Zones can be overcome by the death influencer in a simple suicide.
By using the Anti Zone as the tool in an attempt to prevent players from respawning in their enemy's base, the forger cannot reliably predict that there will always be at least one Respawn Point else where on the map that will have a higher weight.
Finally, another use of the Anti Zone is to reduce back to zero the applied weight of one or two Respawn Points in a sea of Respawn Points blanketed by a Weak Zone. In a complex structure, this may be an economic way to utilize the various Respawn Zones to affect the desired spawn experience.
The same can be said with using Weak Zones to fine tune a few Respawn Points that are in a much larger Anti Zone, though in practice this is probably less likely to be the case.
Using Weak Zones
The only thing Weak Zones do is drive up the weights of Respawn Points inside them, to effectively prefer respawning within them. By proper application, the forger uses Weak Zones to inform the spawn engine which specific areas of his creation are desirable areas in which to respawn. The spawn engine would have no other way to know.
The forger can use Weak Zones to prefer respawning in areas near high value objects, such as power weapons or vehicles. The forger might also use Weak Zones to prefer respawning in safe areas, such as inside and under cover of the team base.
Because Weak Zones will draw a player away from an opportunity to respawn near a teammate, care must be exercised. It becomes the responsibility of the forger to ensure that a Weak Zone does not draw a player into a firefight or near to an enemy due to the artificial weight that the Weak Zone represents.
It is quite easy for a Weak Zone to respawn a player in his base facing the back of an enemy who is camped in the player’s base. Without the enemy facing the Respawn Point, the negative weight of his proximity to the Respawn Point may not be enough to overcome the Weak Zone to force the player to respawn elsewhere.
Finally, we know that respawning near a teammate is more ideal than respawning away from teammates, because a teammate’s proximity adds weight to Respawn Points. A Weak Zone is just a little more than a teammate’s proximity weight. Using a Weak Zone is telling the spawn engine that the area covered by the Weak Zone is a bit more favorable than respawning even near a teammate. As a forger, you must decide if that is true or not every time you lay down a Weak Zone on the map.
The Weight Of A Weak Zone Revisited
Bungie stated that a Weak Zone applied about the same weight as a teammate nearby. Experimentation shows that this weight is just a little more than that of one teammate. But it is also less than that of two teammates.
Consider the case where a room is covered with a Weak Zone, and has four Respawn Points inside the room and one just outside the room. Now let’s say that a Falcon gets shot down with three teammates on board. They all die at the same time. They respawn nearly simultaneously.
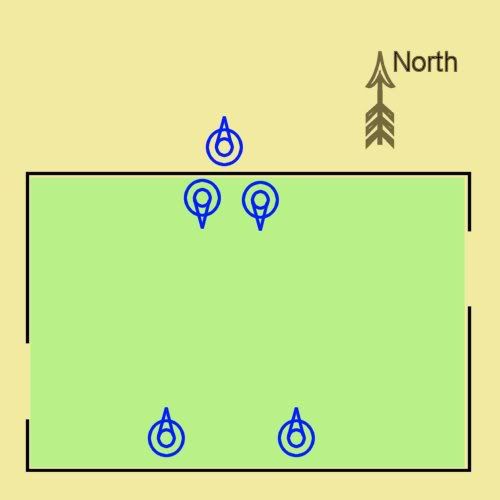
The four Respawn Points inside the room are the highest weights on the map. The first player respawns on one of the Respawn Points inside the room. The spawn engine randomly selects one of the two along the north wall. The second player will respawn inside the room as well, as close to the first as possible, also along the north wall. Now the third player must respawn. But instead of respawning in the safety of the room along the south wall, he respawns outside on the Respawn Point closest to his two teammates.
The spawn engine does not know there is a wall there, or even what the implications of that wall could mean to the game play. But the forger does. And the forger needs to ensure that the spawn engine does not allow the proximity of the Respawn Points to cause unintended respawns during the game.
One way to correct this problem is to double up the Weak Zones (assuming there is a Strong Zone covering that portion of the map). However, this solution compounds the problem by driving players to respawn in their base with even greater disregard to potential scenarios involving enemies camping in the base.
The correct solution is to move the Respawn Point on the exterior of the building away from the Respawn Points inside the building so that teammate proximity cannot be used to prefer the exterior Respawn Point over the safety of the interior of the room.
Team Assignments For Strong Zones
Typically, maps use team assigned Strong Zones so that the red team has one half of the map to respawn on and the blue team has the other half. This prevents, for example, a blue team member respawning right by the red team flag in the red team base.
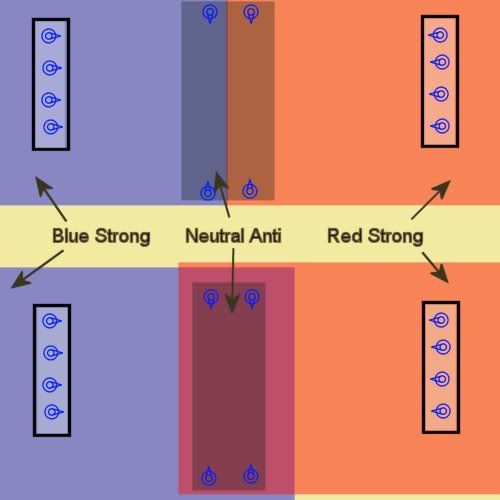
For larger maps, each teams’ Strong Zone can cover more than half; say, two thirds of the map each, with them sharing the center third of the map as a valid respawn area. This offers more opportunity to avoid spawn killing by increasing the number of Respawn Points available to each team, while it also prevents players from respawning inside their opponent’s base.
Neutral Assignment For Strong Zones
A neutral Strong Zone covering the entire map enables Weak Zones and Anti Zones to combine their weights together, while not imposing any restrictions on where a team may respawn on the map. (In this case, team assigned Respawn Points might be used to restrict team respawn locations.)
A neutral Strong Zone covering the entire map can also be used to optimize the application of Strong Zones for multiple game types. Say a map supports slayer, flag, bomb, and territories. You want to divide the map in half between red and blue team for use by Territories, Flag, and Bomb. You use only two team assigned Strong Zones to do this and you match them to game type TEAM_ONLY.
But for Slayer you want to employee dynamic spawning, where once the game begins, it doesn't matter where any player respawns. (Dynamic spawning is controversial. Since there are no objectives to protect, the emphasis is to respawn in the safest possible place on the map, even if that is in the enemy base.) You can blanket the map with a neutral Strong Zone that matches to game type SLAYER, essentially removing the effects of the red and blue Strong Zones for Team Slayer games. This design strategy requires only three Strong Zones on the map in total.
(update) However, there are a couple of things to keep in mind when using a neutral assigned Respawn Zone. First, make sure you set it to FFA_ONLY and the GAME SPECIFIC property to TRUE. Otherwise, unlike a team specific assigned Respawn Zone that can only match a team even when it is spawned on the map for FFA games, the neutral assigned Respawn Zone will be enabled for any game, not just FFA games alone. Second, Stock Pile will enable the zone, making it incompatible with the Stock Pile game type.
Team Assignments for Weak Zones
Let’s go back to the scenario where a map has two Strong Zones, one for red team and one for blue team, with each Strong Zone covering half the map.
Within those team assigned Strong Zones, you can add neutral Weak Zones or team assigned Weak Zones to give preference to, say, Respawn Points in the team base. Either neutral or team assignment will work, as each team should only be capable of respawning on their side of the map in the first place.
However, using neutral Weak Zones allows those same Weak Zones to be used in FFA games, while using team assigned Weak Zones prevents their use in FFA games.
Advanced Topic – Another Case For Team Assignments For Weak Zones
There are times when you want to give Weak Zones a team assignment. If you design a map with two primary bases, you can design the map further for four teams (red, blue, green, orange) or even six or eight teams. These are unusual, but it can be done and done well.
Typically a map is divided in half. One half is covered with a blue Strong Zone and the other half covered by a red Strong Zone.
Now the same region that is covered with the blue can also be covered with a green Strong Zone. The same is true with an orange Strong Zone covering the same region as the red Strong Zone. This way the map still functions as anticipated with two teams, but can accommodate 4 teams.
Now you can give the blue base more than one Weak Zone apart from each other, one for blue and one for green. These Weak Zones are NOT neutral for this scenario. Same is true for red and orange.
Now you may ask, "Why not just use team assignments for Weak Zones and Anti Zones all together?" Because in FFA, a neutral Weak Zones and Anti Zones can be used to prefer or deter spawn points by the spawn engine as well as the team whose Strong Zone overlaps the Weak Zones and Anti Zones.

____________________________
[1] Rocket Launcher on Forge World has been shown to overcome a Strong Zone’s influence. After consulting with Bungie, it was later discovered that there is a behavior pattern that has now been uncovered. I am trying to get Bungie to analyze this and get more information from them. It appears that LOS of many weapons on any map can overcome a strong zone if there are more team compatible spawn points outside the Strong Zone than in the Strong Zone. I intend to write another article to discuss this one influencer soon to discuss how to take advantage of this behavior.
[2] While LOS influencer from Rocket Launcher has been shown to overcome a Strong Zone’s influence, it is not clear if the game type impacts this influence to any degree. Also, excluding Rocket Launchers from a map cannot in itself prevent Rockets from appearing in the game, as the game type can choose to arm players with Rocket Launchers as their primary or secondary weapon.
I'm afraid I don't understand this "Line of Sight" business. Could you elaborate on the details?
ReplyDeleteLine of Sight (LOS) is the zone of influence produced by the direction of your aiming a weapon. According to Bungie, it is a cone shape zone that extends from the weapon.
ReplyDeleteYou said that placing Neutral Weak zones within team-assigned strong zones allows those weak zones to also work in FFA. I have some questions about that.
ReplyDeleteFirst of all, in what way, if any, do team-assigned strong zones affect spawning in FFA games, if not set to only function in team games? For example, if each half of the map is blanketed by two strong zones, one blue and one red, do these strong zones act as neutral strong zones when switched to FFA, or are they just void since there is neither a red or blue team? If it acts as one giant neutral strong zone, it defeats the need for placing a neutral strong zone blanketing the map solely for FFA.
Second, what, other than LoS, affects individual respawn points (I know teammates slightly positively influences them), what is the radius of each respawn points' sphere of influence, and does the amount of influence slowly taper off as you approach the outer edge of said sphere, or is it a cut-and-dry, fine line edge? In other words, if the effective radius (if there is any) of influence for a respawn point is 5 units, then would a teammate who is 2 units away from that respawn point have more or equal influence than if that teammate was 4 units away?
I don't know if you know the answers to any of these questions, but you obviously have an incredible knowledge of respawn zones (and probably respawn points as well), so I thought I'd ask. Anyways, sorry for the long post, excellent article, and I hope to get a reply soon.
Thanks!
EDIT: I just read your Respawn Point article as well, which answered my first question in the above post, but the ones regarding influence spheres or respawn points (I assume they're spheres), I'm still not sure about.
ReplyDeleteAs far as I am aware (and I am always looking for people to share cites to Bungie quotes and documents) the LOS is the only influencer that is not a cylinder. JonnyOThan explicitly stated it was a cone shape. All other shape descriptions have been either explicitly or implicitly cylinder shape or none was provided at all.
ReplyDeleteSome influencers drop off immediately and others decay after a point to yet another point. I do not have an exhaustive list of these. However, I do know from JonnyOThan that the cylinder influencer of the strong zone created by Stock Pile drop point is 5 units up and down, and 15 units radius and drops off immediately, and that the death and proximity influencers decay. I suspect static influencers drop off and dynamic influencers decay, but I cannot say for certain.
A cylinder shape? That seems odd to not have a omni-directional symmetric shape to represent the area around a respawn point in which an influence, such as a teammate or death, can weight it positively or negatively...
ReplyDeleteThat means that vertical distance isn't weighted the same as horizontal distance from a respawn point in situations where decaying influences measure the distance from event to respawn point to determine the weighting on that spawn point. Seems odd to have a system like that to me.
Thanks for the swift reply!
I did not say that a proximity influencer is not spherical. I said that some influencers are explicitly said to be and some implicitly to be cylinder and some are not described at all. The dynamic influencers could all be spherical. Because there are no cites from Bungie, we really don't know with certainty. But given what we do know, you may be able to construct a test that could prove if it is cylindrical or spherical. Go back to high school geometry and put two spawn points equal distance from a player. Remove the death influencer VERY far from the test site, and see which spawn point the player spawns at repeatedly. If vertically, then it is likely cylinder. If both horizontally and vertically, then either the influence is dropped off too much or it is spherical.
ReplyDeleteGreat nice useful woo!
ReplyDeleteWarning, this post consists of 2 parts, due to length.
ReplyDeletePart 1:
That was a long read indeed. I'm amazed I got all of that.
But I'm missing some crucial pieces (these may be the ones you mentioned bungie wouldn't give away, being meaningless)
Easily explaining all of this in a formula:
y = x + b
y = the spawn weight (/Value)
b = basic weight, produced by respawn zones.
x = other influencia
So you stated that strong zones are immensely powerful compared to any other zone or situations, so taking that as 10000 would be appropriate.
Say, we're on the red team, and we have a strong zone (team specific for red team):
we'd have, b = 10000
so y = x + 10000
Whatever influence we have, red team is likely to spawn in that zone, just because of the strong zone giving the area an extremely high boost. And we wouldn't spawn outside the zone, because y = x won't make the cut against 10000.
Also, having a blue team strong zone, will have the same affect for them, in a different area. Any areas with multiple colored zones in the same gametype will neutralise each other, so team slayer with red and blue strong zones both taking 2/3 of the map, the 1/3 in the middle of the map would be neutral, and the other areas either Only Red team, or Blue team, right?
Aside from the strong zones, there are weak and anti zones, in the formula they'd represent +10 (weak) and -10 (anti), you can combine them with strong zones, but they can work separately outside as well, but it wouldn't have any purpose because the strong zones give a +10000 boost, while (for ex.) a weak zone only gives +10, so to have weak zones work outside the strong zones, (in this case) you would need 1000 weak zones to pull it off.
So that's as far as the 'b' part of the formula goes, but then we have the influencia.
Part 2:
ReplyDeleteLet's complicate:
a = teammate near (say value '+100')
c = enemy near (say value '-100')
d = death near (say value '-1000')
e = LOS (lines of sight) (say value '-300')
f = gunfire (value????)
b = basic weight, produced by respawn zones.
y = the spawn weight (/Value)
Together forming the formula:
y= b+100a-100c-1000d-300e-xf
So, nobody knows the exact values of these, because bungie doesn't have a website for these matters, and because they claim the information being useless.
So finally getting down to my questions:
1) Did I make any mistakes in understanding anything about the stuff I wrote?
2) Does gunfire have any direct influence on spawnpoints and how strong is it?(In case of suggesting that the spawnpoint radius is a sphere, imagining it's a bubble, and the gunfire being bullets going through that bubble)
3) Can we be sure about 'teammate near influence' being equal to 'enemy near influence'?
4) Is it possible that our teammates would spawn in front of enemies, if the enemies' detection sensor radius is just out of reach in a, say, "triple room" object, from one side to the other, with that triple room being a red team strong zone in combination with a red team weak zone and the enemy being on blue team? Do we have to be afraid of that occuring at all?
5) Has it already been tested, that spawn zones can be timed after the start of a round, say, on a five chambers map, the first teleporter spawns at 0:40 into the game for the players to move on to the next area, then, for the zombies, an anti spawn zone would spawn in their spawn, and a weak spawn zone in the next area (where the humans went) at 0:50 into the game. I believe that would cause the zombies to spawn in the next area, avoiding the horrible walk the way there, unless death and spawn killing would occur round about those spawns, sending them back to the start where the humans can't spawn kill them.
Would this be an effective way of helping the zombies onwards in "Section, or Areal games" like five chambers?
Please take your time to answer these questions to your best extent. I'd really appreciate it, and thx for reading all this as well.
Kind regards,
~The Persister
PS: Sorry if I made any grammar mistakes, I'm Dutch ;P!
Btw, your thread is awesome!
In answer to your questions, (1) sort of, but you are getting confused by trying to understand more than what Bungie has told us. My articles are simply explaining how the zones impact spawning, but not by how much, and that is all we can do - and all we really need to do. (2) To my knowledge Bungie has not addressed gun fire as influence. The best I can say is that they have said explosions have no affect since they are instantaneous. (3) As far as I know, Bungie never told us how much the enemy and team mate influencers are, and it is my experience that enemy influence is stronger. But since it is merely my experience, I can confidently say your mileage may vary. (4) YES - and it makes sense once you understand these rules. (5) Zones cannot be spawned in on a timer.
ReplyDeleteThx very much for your reply, it's really useful, and as for zones spawning later on in a game, that might be an idea for halo 4 ;)
Delete~The Persister